The jobs: Instead of a showcase work this week, we have a showcase theme: the garden! We’ll be taking a whistle stop tour of some bespoke (and surprisingly affordable) buildings the Keysquare joiners and glaziers have created to bring a touch-of-class to the garden.
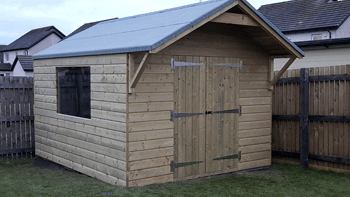
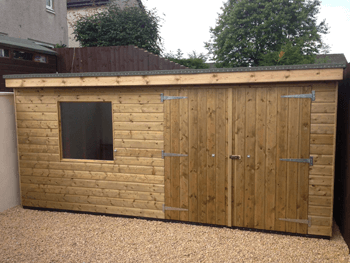
Sheds: We begin with two handsome made-to-measure pine sheds constructed for some garden makeovers: one with a pitched felt roof, and the other with double doors.
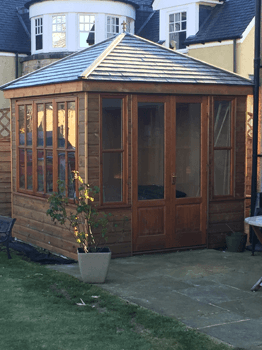
Summerhouse: Next up is this elegant pine summerhouse with hipped cedar shingle roof. Designed to complement the graceful house behind and double-glazed to provide a cosy lookout on the beautiful garden, summer and winter, we think it looks equally fine, stained or painted.
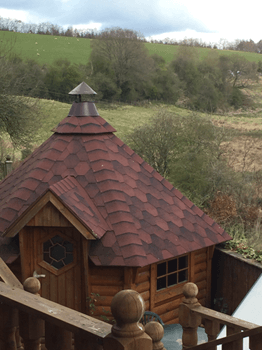
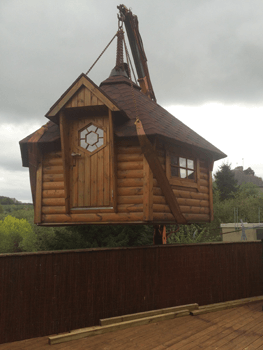
BBQ Hut: To finish is this charming stained-pine log-roll hut with cedar shingle roof. In the photos below you can see it getting craned in and in its final home, with a gorgeous outlook over the Scottish countryside, and looking like it’s fallen out of a fairy tale!
Something to think about for next Summer, perhaps? We hope you’ve enjoyed the garden tour and look forward to seeing you for next week’s showcase.
The job: In an upgrade of the Victorian Scottish home of an existing Keysquare customer, we were to replace 36 sash-and-casement windows to match the originals.
In Parts 1 and 2 of this series we followed the journey of one of these beautiful bespoke windows from the arrival of raw wood battens in our workshop, through the hands-on manufacturing process, to its final installation in one of the upstairs bedrooms.
If you haven't read the other two yet then you can pick them up at the links below:
Part 1: from raw wood to first assembly
Part 2: from first assembly to completed installation.
Our third and final part comes courtesy of one our talented joiners, Neil. Capturing his role on his cameraphone, he has edited together this excellent 1 minute movie of the end-to-end process for us. Great job, Neil! Enjoy!
What our customer said:
Our daughter had expected to be out of her room for a night, but returned home to find it dust-sheet free, spotless and ready to use. We're really delighted both with Keysquare's craftsmanship and their consideration for our home and family.
The job: Welcome to the second part of our series about how we realise a heritage sash-and-casement window, from raw wood to completed installation.
The window in question is one of 36 we’re currently making for an upgrade of the exquisite, period Scottish home of a long-standing customer.
In Part 1 we followed the hands-on development of our window from the arrival of the crude timber battens at our Doune workshop, through to its first assembly, shown in the photo below. (If you missed the first instalment, you can read it at: How we make a Sash-and Case Window. Part 1)

Our approach: So what happens next? Believe it or not, once we’re sure everything fits and functions smoothly and reliably, we then dismantle much of the window again ready for our painters!
After carefully painting all outside-facing parts, these are returned to our joiners to piece everything back together for the second time. They install the parting beads and baton rods, and then go over everything with a fine tooth comb to ensure a pristine finish.
At this time our glaziers also fit the made-to-measure double-glazing, fitted with toughened, low emissive glass and featuring a black spacer which creates the look of a single pane.
Now our window is ready to be transported to its new home.

In the photo below, you can see one of our skilled tradesmen in the first floor bedroom, preparing the opening for our new window.
This involves removing the old window, as well as any panelling and mastic sealants which might detract from the look of the new installation.

Next our new window is wedged into place, and the surrounds insulated and touched up. The downstairs windows had not been replaced at this point, so you can appreciate from the picture below how faithful our design was to the original.

Below is the charming scene that greeted our customer upon entering the room. A beautiful view, beautifully and traditionally framed!
If you missed Part 1, you can read it at: How we make a Sash-and Case Window. Part 1
Or check the great little video one of our talented joiners made to capture the end-to-end process at: How we make a Sash-and Case Window. Part 3
What our customer said:
Our daughter had expected to be out of her room for a night, but returned home to find it dust-sheet free, spotless and ready to use. We're really delighted both with Keysquare's craftsmanship and their consideration for our home and family.
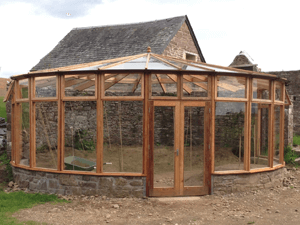
The job: An existing customer living in an old hillside farmhouse, wanted an orangery where she could grow tropical fruit throughout the Scottish year.
Our approach: A location was chosen, framed by the walls of old farm buildings, one of which featured a rough curve.
This sparked the idea of creating a large circular glasshouse, with its back and circumference determined by this wall section. When we presented our customer with our hand-drawn design, they were delighted.
Using the curve of the wall we established the radius and central point of the building. From this we marked out the foundations and established the dimensions for the individual components of the build.

While our joiners were manufacturing these in our Doune workshop, onsite we set to building the foundations, using natural stone reclaimed from the ruins of the old farm buildings.
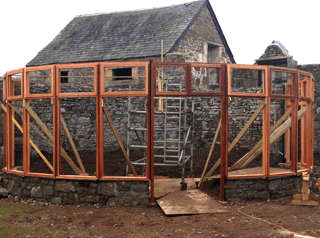
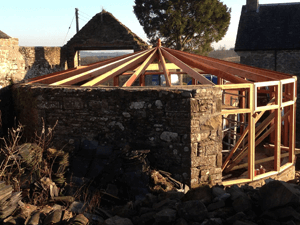
Next, we erected the wall panels, before cutting and fitting the spoke of rafters. This timber chosen was western red-cedar, a soft red-brown North American timber. Valued for its distinctive appearance, aroma and resistance to extreme weather conditions, it is often used for sailboats, kayaks, as well as wall cladding and outdoor buildings.
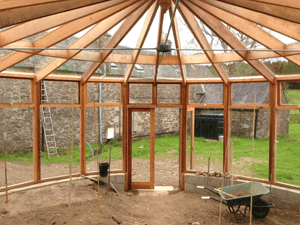
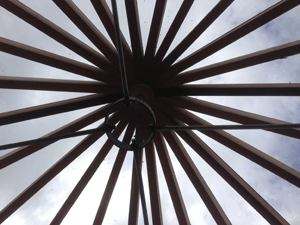
Finally we installed all the glazing works, using safety glass throughout, crowning all with a finial turned on our workshop lathe - a graceful finishing touch to a graceful space.
What our site manager said:
We are very proud of our design and construction of this unique building, which has exceeded all expectations.
The job: This is a continuation of last week’s article about a major attic conversion we conducted over the summer.
The project was to create a new room for an award-winning local nursery, and our challenge was to finish before the children returned from their holidays.
Our last job was to build the new upstairs cloakroom.
Our approach: Much of the preparations for the cloakroom had already been made during the works we described last week. Our plumbers had installed new pipework which ran behind the new bespoke steel staircase and up under the chipboard we'd laid as the first layer of new upstairs flooring.
The under-stair section was double-protected with both fireline board and a shaft wall. This meant that in the event of a fire, heat travelling through the pipes could never endanger or damage the stairwell.

The fire-proof wall we’d constructed earlier to create a safe space for the staircase, extended all the way up to the eaves and provided the walls for the new cloakroom.

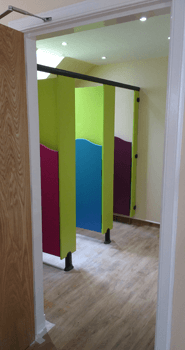
When all was done upstairs, we installed the toilets and sinks, positioning them at the right height for our little customers.
Our plumbers then connected the pipework up to the supply for the disabled washroom downstairs, where we also added a layer of ceiling fire-proofing to protect the new room above.
Finally our change works manager sat down with the staff to choose colours for the toilet cubicles from a brochure. These were then manufactured and installed. As you can see from the picture above, the staff made a superb choice!
So were we done in time for the new arrivals? Of course (but only just!)!
What one of our Facebook followers said:
Everyone that was involved in this transformation did a fantastic job! The children are loving their new room! And staff too!